Here is a selection of 5 useful post-production techniques that will make your wedding clients’ albums that little bit extra special. From getting rid of unwanted items to delivering the sharpest and most striking images, there’s still plenty you can do to improve your clients’ wedding photos after you’ve switched the camera off.
5 post-production techniques you should always remember
Smoothing
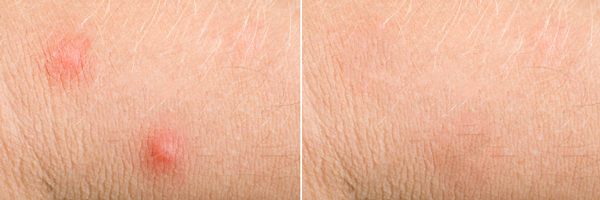 Smoothing is one of the most popular post-processing techniques used by professional photographers. Many of the photos you see of famous celebrities are often processed in Photoshop; faces are often smoothed with the blurring, healing or cloning tool, which can help remove or reduce the appearance of wrinkles, blemishes or acne.
Black and white
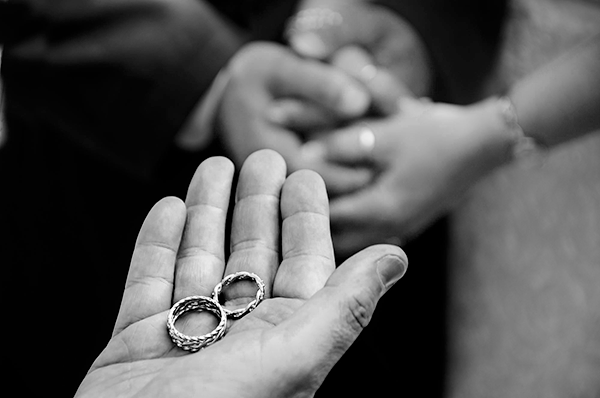 The black and white effect is what transforms a wedding photo into a timeless work of art. Many photographers will often increase the contrast between the highlights and the shadows in black and white photos to make the image dramatic. Indeed, the contrast between the brightness of a wedding dress and the darkness of a wedding suit can look much more impressive in a traditional black and white format.
Remove unwanted objects
It is very difficult to take a photo without at least one undesirable object in the background. Whether it’s an obtrusive crane in the distance, a piece of litter on the grass or an unsightly van in the background, post-processing software enables you to remove these objects almost effortlessly, as long as they are relatively small in size and do not overlap with too many other items. For example, you can remove litter on the grass by simply placing the healing tool on the item; the tool will automatically remove the unwanted object and replace it with the same texture and colors as the surrounding background. This is also a useful technique for removing ‘unwanted’ items in the sky like planes or sun glares, which can otherwise compromise your wedding photos.
HDR
 HDR (high dynamic range) photography has became immensely popular over the last decade or so thanks to the recent advances in technology. This technique helps you achieve a much wider dynamic range between the shadows and the highlights of your photos and is ideal for dark, indoor environments like churches, where photos taken with just a standard exposure setting may appear too dark. Without HDR, the highlights (such as light from windows and lighting) may appear washed out and overexposed, while shadows may look too dark, particularly on a cloudy day. To perform HDR correctly, you must use a suitable tripod and take at least two or three photos at different exposures as quickly as possible. It is also imperative that the people in the picture are instructed to stand/sit as still as possible; this will ensure that the final image will be as sharp as possible when the different exposures are merged into the HDR photo.
Panoramas
A tripod is also useful when you’re taking multiple photos and plan to stitch them together to create a much wider image. Large wedding receptions with hundreds of guests can be difficult to capture in just one photo, especially if there are space constraints. When capturing each photo, ensure that there is at least a 30 percent overlap between each image; this will help you achieve better results and a more uniform horizon. Ask everyone to remain as still as possible with their eyes focused firmly on the camera. There are few other occasions that enable photographers to capture all of their clients’ family and friends in one single image, which is what makes a panoramic wedding photograph such a special gift. Alternatively, if you have enough space, you may want to consider using a telephoto lens and taking the photo from much further away, removing the need to use multiple photos altogether.
Don’t forget to prepare everything before the wedding
Make sure your tripod is sturdy and up to the job or invest in a new one, ensure that you have allocated plenty of time to process your photos after the wedding, and don’t forget to check the weather forecast the day before in case you need to bring any extra clothing or equipment for the big day.

