Beginner’s Guide to Building a WooCommerce Store that Sells
With WooCommerce powering over 44% of all e-commerce websites worldwide, it’s the first port of call for many people who want to start selling online. Maybe you’re starting a new e-commerce business, or perhaps you’re already selling online and want to switch to WordPress and WooCommerce. Whatever your reasons, you can use WooCommerce to sell almost anything.
But the question is, where do you start? And how do you take WooCommerce to the next level and make your store a success?
Today, I’m going to tell how you to set up WooCommerce in a way that focusses on sales. Getting your website live isn’t the goal (although this is important too!). Our goal is to create a WooCommerce store that will be successful, attract customers and maximize conversions. After all, that’s the true measure of success for any online shop.
There are plenty of WooCommerce tutorials out there, and I won’t reinvent the wheel by repeating everything that has already been said. Instead, I’ll bring together existing resources to create the ultimate guide on how to build a truly successful WooCommerce store that sells.
What To Expect
Keep reading to discover how to transform any WordPress website into a fully featured WooCommerce online shop. You can either read the whole article, or jump straight to the part you’re interested in:
- Creating a WordPress Website
- Choosing a Theme
- Choosing a Payment Provider
- Setting Up WooCommerce
- Adding Products
- Structuring Your WooCommerce Store
- Displaying Products
- Adding Plugins
- Building Your Sales
- Monitoring Your Success
- Further Resources
Creating a WordPress Website
The first step to building a successful WooCommerce store is to create a WordPress website. WordPress is the platform that will power your entire website. You can’t use WooCommerce without WordPress, because WooCommerce is a plugin that needs to be installed on a WordPress website.
If you’ve already got a WordPress website and want to start selling online with WooCommerce, then you can skip ahead. If not, then this is what you need to set up a basic WordPress website:
- WordPress – This is your content management system and is free to download from wordpress.org. (However, that’s not the easiest way to install WordPress – keep reading to discover an easier way.)
- A domain name – All websites need an address or domain name. For example, the domain name for the website you’re currently visiting is
creativebeacon.com. You can buy a domain from any domain name registrar such as GoDaddy. To get your WooCommerce store off to the best possible start, I recommend choosing a credible-looking, easy-to-remember domain name that is suitable for your target market. For example, choose an extension (e.g. .com, .co.uk or .net) that will reassure customers that you’re a real company and sell to their country. Spend some time typing ideas into a domain search tool and try to find the best available domain name. - A hosting company – If you’re a WooCommerce beginner and want to create a successful store, then I strongly recommend using a good quality managed WordPress host such as WP Engine. A fully managed host will give your store the best possible foundation. Your site will be easier to manage and faster to load, too. The hosting will come with easy-to-use tools for basic tasks such as installing WordPress, backups and restores.
Choosing a Theme
Once you’ve got a basic WordPress website up and running, it’s time to choose a theme. This is really important, because a WordPress theme controls the overall design, look and feel of your website.
The first decision is whether to get a custom theme or an off-the-shelf theme.
A custom WordPress theme is ideal because you get full control over the design of your WooCommerce store. However, to create a professional-looking website that is well-coded and robust behind the scenes, you’ll need a professional designer and developer. This WooCommerce tutorial is aimed at beginners without coding experience who want to set up their own website. As a result, I’m going to focus on off-the-shelf themes.
You need a theme that will be reliable and provide a firm foundation for your website. The official Storefront theme is a good starting point. If you don’t like the design then there are plenty of Storefront child themes to choose from.
Whichever theme you use, make sure that it supports WooCommerce. This means that it has been tested with WooCommerce. It might even have extra styling to integrate your shop pages with the overall design of your website.
Once you’ve chosen a theme, follow this tutorial from WPBeginner on how to install a WordPress theme.
Choosing a Payment Provider
The next decision is how you will accept payments on your WooCommerce website.
First, you don’t have to take payments online. Lots of WooCommerce stores disable online ordering and either convert their store to catalog mode, or accept offline payment methods. WooCommerce has several built-in offline payment methods such as cheque, BACS and cash on delivery. When you run the WooCommerce Setup Wizard in the next step, choose one of these and rename it to anything you like (e.g. “Pay by invoice”).
If you want to accept payment online, then PayPal is the easiest option. Simply enter your PayPal email address in the WooCommerce Setup Wizard, and you’re good to go.
For help choosing other payment options, WooCommerce have provided an excellent article on ‘Which Payment Option is Right For Me?‘
Setting Up WooCommerce
Ok, at this point you should have set up WordPress, installed a theme and chosen your payment method(s). Now it’s time to install WooCommerce!

- Go to the ‘Plugins’ page in the WordPress Dashboard and click the ‘Add New’ link.
- Type ‘WooCommerce’ in the search box.
- You’ll see WooCommerce by Automattic in the search results. Click on the button to Install and then Activate the plugin.
- Next, you’ll be invited to use the WooCommerce Setup Wizard. Run the Wizard and it will take you through all the most important settings for your WooCommerce store. This is pretty self-explanatory and very simple to use.
- Now, you’re ready to start adding products. For more fine-grained control, feel free to navigate to the ‘Settings’ area under the ‘WooCommerce’ menu in the WordPress admin. You can find all the settings here, including more advanced ones not included in the Setup Wizard. Configure the settings to set up your store exactly how you want it.
Pro Tip: When you configure the settings, think about how to improve the buying process and encourage customers to buy more. For example, there’s a setting to automatically redirect customers to the cart page after they choose products. Research shows that everything you do to reduce the number of clicks will increase your e-commerce conversions. Choose your settings with this in mind.
Adding Products
Next, it’s time to start adding products. You can do this by clicking on the ‘Products’ section on the left of the WordPress Dashboard. Use the official documentation to add and manage products.
It’s essential to present each product in a way that will attract customers. Some WooCommerce stores do this brilliantly and others get it very wrong. These are my top tips on adding products that will maximize your sales:
- Use fantastic images – Add 1 or more high quality images of each product. Optimize the images before uploading them to ensure fast page load times. I recommend checking the size of the product images on the demo site for your theme, and making yours the same size and proportions. A lot of stores are ruined by using images that don’t look right with the theme.
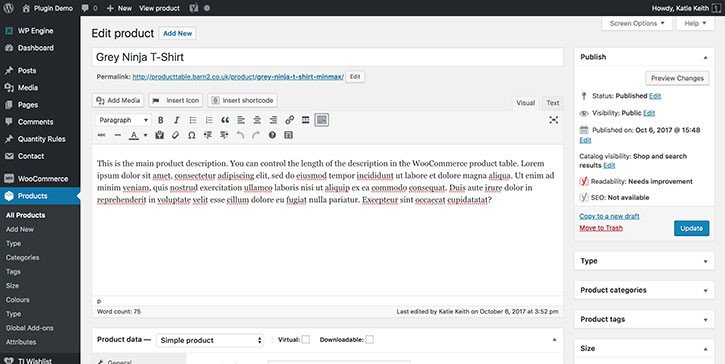
- Use the short and long description correctly – WooCommerce products have 2 types of description. In most stores, the short description (which you’ll find at the bottom of the ‘Add Product’ screen) appears near the top of the product page – just above the price and add to cart button. Keep the short description short – you don’t want to push the add to cart button too far down. Use the long description (i.e. the main content for the product) for more in-depth information.
- Add multiple options and variations – WooCommerce comes with several product types, including Simple and Variable Products. Simple products just have 1 option, whereas variable products let customers choose between multiple options and price points. Adding product variations is a good way to increase your sales, as you can offer the basic version at a lower price and appealing-looking alternatives that encourage them to spend more.
- Cross-sell your products – Use cross-sells and up-sells section to select specific products to appear at the bottom of the product page and in the cart. Choose products that are similar to the current one but more expensive. This encourages customers to spend more.
- Use reviews wisely – Most WooCommerce stores activate reviews without a second thought. Reviews are fantastic if they’re (a) positive; and (b) people actually add them in the first place, otherwise they can have a negative effect on sales. If you activate reviews, actively encourage customers to add them. For example, implement a process where you request a review whenever someone contacts you for support and is happy with the service received.
- Use multimedia content – It’s easy to embed multimedia content such as audio and video into WordPress. Use it to boost sales. For example, you can add videos showing a product in action. Alternatively, you can use multimedia content to add “social proof”, such as recordings of customers discussing the benefits.
Structuring Your WooCommerce Store

All successful e-commerce stores need an intuitive, user-friendly navigation structure. This helps customers to find the products they’re looking for. Fail to get this right, and they’ll quickly get fed up and buy elsewhere.
WooCommerce comes with several ways to help people find your products. Use them logically to achieve the best structure possible:
- Categories – Use this for wide groupings. For example, a WooCommerce clothes store might have top level categories for ‘Women’ and ‘Men’, each with sub-categories for ‘Tops’, ‘Trousers’ and ‘Coats’. Categorize products in the ‘Categories’ section on the right of the Add/Edit Product screen.
- Tags – Use these for extra labels that aren’t a specific feature of the product, but that people might be searching for. Examples of tags on a clothing website might be ‘100% cotton’ or ‘Non-Iron’. Add tags via the ‘Product Tags’ section on the right of the Add/Edit Product screen. (Tip: Don’t confuse this with the ‘Tags’ section, which isn’t WooCommerce-specific and is also used for blog posts and other content types.)
- Attributes – Use product attributes for specific features of the product. You can create attributes that people will use to find your products, e.g. via filters and extra data displayed on your website. Alternatively, you can convert your attributes into product variations so that people can actually choose different options based on the attributes. For example, a T-shirt might have attributes for Color and Size, each with various options. The easiest way to create attributes is via Products > Attributes in the WordPress Dashboard. Create them here, then select them for each individual product.
Displaying Products
After you’ve added and structured your products, you need to display them on the front end of your WooCommerce store. The aim here is to make it simple and intuitive for customers to find products. Focussing on sales is essential here – small changes in how you display your products can make a huge difference to conversion rates.
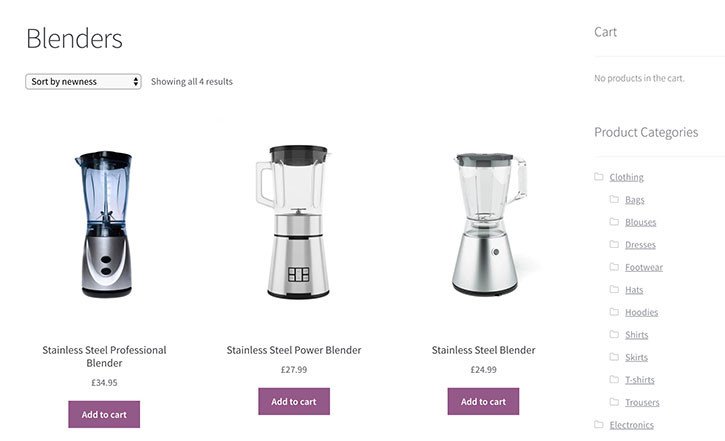
Your WooCommerce store will come with some default layouts, either provided by your theme or WooCommerce itself. These typically consists of a main shop page and product category pages with a grid layout. The default product grid normally has around 3 products per row with a large image, name, price and add to cart button. It won’t include any extra data such as description, attributes or variation dropdowns. Customers must click through to the single product page for further information.
The single product page contains all the information about each product, so this is where customers will normally make buying decisions and add to the cart. That’s fine for large products such as furniture, where customers will need to read a lot of information and spend time making their decision. However, it can have a negative impact on conversion rates for smaller products because it slows down the buying process.
Speeding Up the Buying Process
You can speed up your customer journey by adding plugins to display products in different ways. For example, the WooCommerce Product Table plugin adds a table view to your store, which you can use in addition to – or instead of – the default layouts. A product table plugin can increase conversions because:
- You can show more product data without forcing customers to click through to the single product page. The product table can include whichever columns you like, including extras such as product attributes and tags.
- Customers can select variations and quantities directly from the product table view.
- There are multi-select checkboxes, so customers can select multiple products and add them all to the cart in a single click.
Not all WooCommerce stores will sell best using the default layouts. Equally, not all stores will benefit from product tables. Think about the types of products you’re selling and which option will convince customers to buy from you.
Adding Plugins
WooCommerce itself comes with a surprising number of features given that it’s a free WordPress plugin. Before adding extra plugins, I’d always recommend experimenting with the features that come with WooCommerce. You’ll be amazed at what you can achieve straight out of the box!
If you need features that aren’t available in the WooCommerce code, then there are literally thousands of plugins to choose from. These work alongside WooCommerce by adding extra functionality. By combining WooCommerce with the right plugins, you can create literally any type of online store.
With thousands of plugins available, I couldn’t possibly tell you about them all. Instead, I will tell you how to find the right plugins for your specific needs.
Where to Find WooCommerce Plugins
There are 3 main ways to find plugins to add features to your WooCommerce store:
- WordPress.org – The official plugin repository contains many thousands of WooCommerce add-ons, and they’re all free! Only use plugins that have good ratings. Make sure they have been updated in the last few months. Also make sure they have a reasonable or high number of active installs.
- Official WooCommerce Extensions Store – WooCommerce.com is the best place to find reliable, well-tested plugins that are guaranteed to work together. They’re more expensive than plugins sold on third party websites, but it’s usually worth the extra.
- Search engines – If you’re looking for a very specific feature, then it’s often best to type your query directly into Google. This will bring together plugins from all sources, such as third party developers and other marketplaces. There are plugins available to add almost every possible feature to WooCommerce, so a general search is often the best way to find one.
Wherever you get your plugins, make sure you look for evidence that they will be good quality and reliable to use. There are plenty of clues, such as plugin reviews, a professionally presented website and a good support policy.
I believe that it’s always worth paying for premium WooCommerce extensions if you can’t find a suitable free alternative. Your WooCommerce store is designed to generate income, so this isn’t something to scrimp on. A premium plugin is likely to have had more development time put into it, and will usually be better supported. This is important to keep your store reliable and running smoothly.
Building Your Sales
With so many e-commerce stores available, it’s almost impossible to grow your sales without doing a significant amount of marketing. For the best results, your WooCommerce website marketing strategy should consist of several strands:
- Organic SEO – Building your rankings in the organic search results is the best way to build your online profile for the long-term. You can employ an SEO agency for this, or you can do it yourself. Yoast’s Beginner’s Guide to WordPress SEO is an excellent starting point.
- Paid advertising – The only way to get instant, guaranteed exposure is to pay for it. Where possible, use different types of paid advertising including social media ads, Google AdWords and Remarketing. Also use traditional offline advertising to drive your online sales. If money is an issue, then Neil Patel has written an excellent article on how to market an e-commerce store on a budget.
- Email marketing – Research shows that most customers won’t buy from you on their first visit. Use email marketing to implement a marketing funnel. capturing potential customers’ email addresses and contacting them regularly to build brand loyalty.
Monitoring Your Success
Once your marketing efforts have brought people to your WooCommerce store, you want as many of them to make a purchase as possible. Newt Labs have written a fantastic guide on how to improve conversion rates once your store is live. This covers everything you need to know, including Google Analytics conversion tracking and A/B testing.
Use the available tools to monitor how people are using your site and learn exactly what makes a difference to your sales. Track your sales using Google Analytics and the built-in WooCommerce Reports. Don’t fall into the trap of guessing what works and what doesn’t. There are plenty of excellent tools and resources to give you the evidence you need. Use the data to make ongoing improvements, monitoring the effect on sales and conversions each time.
Putting It Into Practice
To build a WooCommerce store that sells, you need to create a robust website that looks fantastic and makes it quick and easy for customers to buy your products. But that’s only the first step.
Remember – growing your sales is an ongoing process, not a one-off task. Don’t just build a e-commerce website and leave it as it is. To build a truly successful WooCommerce store that sells, you need to continuously evaluate your store and understand how people are using it. Armed with this data, you can make ongoing improvements, monitoring the impact of each one.
By managing your store in this way, you should see your sales continue to increase over time. Before you know it, you should have a successful WooCommerce store that achieves all your objectives. Good luck!

